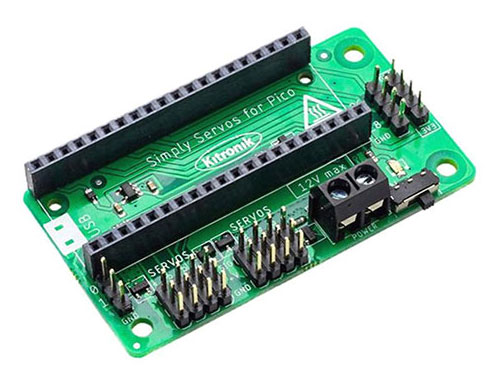
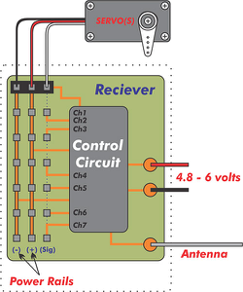
//Rx throttle as LED speed control. Rx Aux 2 as dimmer. Channels 1 and 2 as inputs on Simply Servos.
//Remaining servo ports on board (channels 3-8, pins 4-9) used as NeoPixel outputs.
#include <neopixelconnect.h>

//Number of NeoPixels in each string
#define FIN_LEN 34  //Number of NeoPixels on each fin
#define BOT_LEN 28  //Number of NeoPixels on each bottom skid
#define AUX_LEN 61  //Number of NeoPixels on each auxiliary location
#define THRESH 60   //Landing versus flight throttle threshold

//Rx channel Pico GPIO inputs
#define THROT 2
#define AUX2 3

// Create an instance of NeoPixelConnect and initialize it for each strand of NeoPixels
// (pin, number of pixels in string, programmable IO location (0 or 1), programmable IO state machine usage (0-3))
NeoPixelConnect R_Aux(4, AUX_LEN, pio0, 0);
NeoPixelConnect L_Aux(5, AUX_LEN, pio1, 0);
NeoPixelConnect R_Bot(6, BOT_LEN, pio0, 1);
NeoPixelConnect L_Bot(7, BOT_LEN, pio1, 1);
NeoPixelConnect R_Fin(8, FIN_LEN, pio0, 2);
NeoPixelConnect L_Fin(9, FIN_LEN, pio1, 2);

uint8_t AuxSingLED;  //Single LED variable on auxiliary string

//Function - Get intensity level from Rx Aux2 output
uint8_t get_pixel_intensity() {
  return map(pulseIn(AUX2, HIGH), 900, 2200, 0, 255);
}

//Function - Get speed level from Rx Throttle output
uint8_t get_pixel_speed() {
  return map(pulseIn(THROT, HIGH), 990, 1902, 100, 0);
}

void setup() {
  pinMode(THROT, INPUT);  //Set Pico GPIO pin 2 as input
  pinMode(AUX2, INPUT);   //Set Pico GPIO pin 3 as input
}

void loop() {
  uint8_t LEDInten = get_pixel_intensity();  //Get NeoPixel intensity value
  uint8_t LEDSpeed = get_pixel_speed();      //Get NeoPixel speed value
  if (LEDSpeed < 10) LEDSpeed = 0;           //Dampen lower speed limit

  if (LEDSpeed < THRESH) {                                   //Throttle high color
    R_Bot.neoPixelFill(LEDInten, 0, 0, true);                //Fill string with red
    L_Bot.neoPixelFill(LEDInten, 0, 0, true);                //Fill string with red
  } else {                                                   //Throttle low color
    R_Bot.neoPixelFill(LEDInten, LEDInten, LEDInten, true);  //Fill string with white
    L_Bot.neoPixelFill(LEDInten, LEDInten, LEDInten, true);  //Fill string with white
  }

  R_Fin.neoPixelFill(0, LEDInten, 0, true);  //Fill string with green
  L_Fin.neoPixelFill(0, LEDInten, 0, true);  //Fill string with green

  R_Aux.neoPixelFill(0, 0, LEDInten, false);                           //Fill string with blue
  R_Aux.neoPixelSetValue(AuxSingLED, LEDInten, 0, 0, false);           //Set a NeoPixel to red
  R_Aux.neoPixelSetValue(AuxSingLED - 1, LEDInten / 10, 0, 0, false);  //Set trailing NeoPixel to dimmed red
  R_Aux.neoPixelSetValue(AuxSingLED + 1, LEDInten / 10, 0, 0, true);   //Set leading NeoPixel to dimmed red
  L_Aux.neoPixelFill(0, 0, LEDInten, false);                           //Fill string with blue
  L_Aux.neoPixelSetValue(AuxSingLED, LEDInten, 0, 0, false);           //Set a NeoPixel to red
  L_Aux.neoPixelSetValue(AuxSingLED - 1, LEDInten / 10, 0, 0, false);  //Set trailing NeoPixel to dimmed red
  L_Aux.neoPixelSetValue(AuxSingLED + 1, LEDInten / 10, 0, 0, true);   //Set leading NeoPixel to dimmed red

  AuxSingLED = AuxSingLED + 3;                //Marquis - move R_Aux and L_Aux red LEDs along NeoPixel string 3 pixels at a time.
  if (AuxSingLED >= AUX_LEN) AuxSingLED = 0;  //If at end of string, return to start.

  delay(LEDSpeed);  //Set how long to delay code execution cycle depending upon throttle level.
}

Arduino IDE Code END:
</neopixelconnect.h>
清单 1:用于控制 NeoPixel 灯条的 Arduino IDE 代码。
消除任何延迟功能都将有益于整个程序,通过操作油门的输入值或输入值映射,LED 可以更快地运行。您可根据需要,灵活地选择其余灯条的图案或颜色。请记住,飞行员需要依靠可识别的灯光图案来确定飞机的方位和航向。夜间飞行既有趣又有挑战性。在傍晚时分练习夜间飞行,仍能同时看到飞机和 LED 灯。